phpenvでPHP7.4系を導入した(configure optionをちょっと深ぼる)


実行環境は、macOS Catalina 10.15.7 です。

macOS Big Sur にアップデートしたらどうなるんだろうか….🤔迷ってます


(過去記事でphpenvでよく使うコマンドまとめてます。)

phpenvでいろんなPHPバージョンを操る


しばらくコードを書いておらず、PHPのバージョンが7.3.7だったので7.4系にバージョンあげますー😅

$ php --version
PHP 7.3.7 (cli) (built: Oct  6 2020 15:27:59) ( NTS )
Copyright (c) 1997-2018 The PHP Group
Zend Engine v3.3.7, Copyright (c) 1998-2018 Zend Technologies
    with Zend OPcache v7.3.7, Copyright (c) 1999-2018, by Zend Technologies
    with Xdebug v2.7.2, Copyright (c) 2002-2019, by Derick Rethans

$ phpenv versionsに7.4系が入ってなかったので、

$ phpenv update

からの

$ phpenv install 7.4.9

を実行したら、

-----------------------------------------
configure: error: Please reinstall the BZip2 distribution
-----------------------------------------

といわれたので、
bzip2をreinstallしてパスも通しましたが解決しませんでした。

ググって以下でinstallしてみました。

$ PHP_RPATHS="/usr/local/opt/bzip2/lib" PHP_BUILD_CONFIGURE_OPTS="--with-bz2=/usr/local/opt/bzip2" phpenv install 7.4.9

そしたら、

-----------------------------------------
configure: error: Please specify the install prefix of iconv with --with-iconv=<DIR>
-----------------------------------------

って言われました。どんどん芋釣で問題出てくる、phpenvあるある。
念のため、iconvもreinstallとパスを通して、以下コマンドで再チャレンジ!


!!!解決コマンド!!!!

$ PHP_RPATHS="$(brew --prefix bzip2)" PHP_BUILD_CONFIGURE_OPTS="--with-bz2=$(brew --prefix bzip2) --with-iconv=$(brew --prefix libiconv)"  phpenv install 7.4.9

PHP_RPATHSの指定はなくても良かったかもです🙇‍♂️

\ 🎉7.4系installできたー!🎉 /

[Success]: Built 7.4.9 successfully.
$ phpenv versions
  system
  5.6.1
  7.0.31
  7.1.3
  7.1.30
  7.2.20
  7.3.0
  7.3.7
* 7.4.9 (set by /Users/xxxx/xxxx/.ruby-version)


そもそもconfigure optionってなに?

解決できたコマンドは以下ですが、分解して各々の環境変数が何しているか見ていきます。

$ PHP_RPATHS="$(brew --prefix bzip2)" PHP_BUILD_CONFIGURE_OPTS="--with-bz2=$(brew --prefix bzip2) --with-iconv=$(brew --prefix libiconv)"  phpenv install 7.4.9

・PHP_RPATHS

PHP_RPATHS="$(brew --prefix bzip2)" 

そもそもRPATHってなに!?

https://stackoverrun.com/ja/q/2196869 より

-rpath=dir
Add a directory to the runtime library search path. ….

訳)実行中ライブラリの検索パスにディレクトリを追加します。

\ runtime path=rpathってこと?  runtimer? /


wikipediaさん(https://en.wikipedia.org/wiki/Rpath)にも同じようなことが書いてある👀

configure optionにも--disable-rpathというオプションがあって、以下のような記述がされていたので、なんか解釈あってそう。

–disable-rpath

実行時にライブラリの検索パスを追加できないようにします。


・PHP_BUILD_CONFIGURE_OPTS

PHP_BUILD_CONFIGURE_OPTS="--with-bz2=$(brew --prefix bzip2) --with-iconv=$(brew --prefix libiconv)"

そのままですが、ビルド時のconfigure optionを指定できるみたいです。

--with-bz2 …bzip2を有効にし、bzip2の場所を指定をします。

--with-iconv …iconvの場所を指定できます。


参考:

https://qiita.com/kunit/items/c30147f99a48ebb159d5

https://qiita.com/hnw/items/c227d58528c147de15dd

https://www.ritolab.com/entry/211#aj_5_5


まとめ

PHP書いてるけど、こういうmake系は全然わかりません😭まだまだです💦

rpath=replace pathなのかと思ってた。


Dockerでlocalhostにアクセスできない時に解決した方法。

Dockerの練習をしようと思いnginxをupして、ブラウザ確認したいってなったんですが、localhostで開けませんでした😭

調べてみると私はDocker Toolbox(※現在非推奨)を使っていたため、192.168.99.100ではアクセスできました⚡️

(※Docker Toolboxは非推奨のため、Docker Desktopを使ってとのこと)

Docker Toolbox has been deprecated and is no longer in active development. Please use Docker Desktop instead. See Docker Desktop for Mac and Docker Desktop for Windows.


localhostでは、

$ curl localhost
curl: (7) Failed to connect to localhost port 80: Connection refused

でした。

TerminalとDocker Desktop for Macが同期されていない状態でした。Docker ToolboxはVMを立てる方法で、Docker Desktop for Macはlocalhostを使う為こうなったみたいです。

そこで、Docker Toolboxを削除し、Docker Desktop for Macを入れ直すことで、TerminalとDocker Desktop for Macが同期されlocalhostでアクセスできるようになりました🙌🙌🙌

(Docker Desktop と Docker Toolbox の共存は可能のようですが、Docker Toolboxは非推奨なのでアンインストールしました。)

参考:

https://docs.docker.com/docker-for-windows/docker-toolbox/
https://qiita.com/amuyikam/items/ef3f8e8e25c557f68f6a
https://docs.docker.jp/docker-for-mac/docker-toolbox.html


Docker Toolboxを使っている時

$ docker-machine ls
NAME      ACTIVE   DRIVER       STATE     URL                         SWARM   DOCKER      ERRORS
default   *        virtualbox   Running   tcp://192.168.99.100:2376           v19.03.12
$ docker-machine config default
--tlsverify
--tlscacert="/Users/watashi/.docker/machine/machines/default/ca.pem"
--tlscert="/Users/watashi/.docker/machine/machines/default/cert.pem"
--tlskey="/Users/watashi/.docker/machine/machines/default/key.pem"
-H=tcp://192.168.99.100:2376
$ env | grep DOCKER
DOCKER_HOST=tcp://192.168.99.100:2376
DOCKER_MACHINE_NAME=default
DOCKER_TLS_VERIFY=1
DOCKER_CERT_PATH=/Users/watashi/.docker/machine/machines/default
$ curl http://192.168.99.100/
<!DOCTYPE html>
<html>
<head>
<title>Welcome to nginx!</title>
...


Docker Desktop for Macを使っている時

Docker Toolboxを削除し、Docker Desktop for Macを入れ直しました。
docker-machineコマンドを削除したので…

$ docker-machine ls
-bash: docker-machine: command not found
$ env | grep DOCKER
# なし

おまけ: 調査で使ったコマンド

ポートが開いてるプロセスの確認

$ lsof -i -P | grep localhost
$ lsof -i -P | grep 192.168.99.100

GASでGET,POSTを受け取る方法


久々のGASについてです!

個人的に作りたいアプリが浮かんだので、それを作るためにGASを使うことがあったのでおさらいがてら書きます✏️

参照:https://developers.google.com/apps-script/guides/web

やることはたった3つです!!!

  1. GET,POSTを受け取る関数を書く
  2. 公開する
  3. 動作確認してみる

1. GET,POSTを受け取る関数を書く

引数eでクエリストリングなどの詳細も取得できますー🌱
GETメソッドを受け取る場合

function doGet(e) {
  console.log('getされました');
}

POSTメソッドを受け取る場合

function doPost(e) {
  console.log('postされました');
}

2. 公開する

これをしないと、実際にこのGASにアクセスするURLが発行されません💦

  • ファイル > 版を管理…より説明文を適当に書いてバージョンをSave new version→OKします。
    (最初はバージョン1で保存されると思います。)
  • 公開 > ウェブアプリケーションとして導入 より、project versionを↑で保存したバージョンに、
    Execute the app as(アプリの実行方法)、Who has access to the app(アプリにアクセスできるユーザー)を選択し、「更新」を押下します。
  • Current web app URLが発行されます🚀
    このURLにリクエストすることで、1で作った関数が実行されるようになります。

3. 動作確認してみる

Talend API Testerを使って、リクエストしてみます。
「METHOD」を選んで、2で発行されたURLを貼り付けて、「Send」するだけです。
200が返ってきたので、いい感じそうです🍻

GASのログも確認してみましょう👀(表示 > ログ > App Scriptダッシュボード)

まとめ

個人的に、
Execute the app as(アプリの実行方法)、Who has access to the app(アプリにアクセスできるユーザー)の設定どうするかが気になりました。
個人で使うものであれば、「自分だけ(only myself)」がアクセスできて、「自分(me)」が実行でいいかなと思います。


「Write your first Flutter app, part 1」をしてみる!


最近よくみるFlutterでHello Worldしてみる

前回はFlutterを使ってHelloWorldをしたので、今回は。。。

Flutterの公式ドキュメントより、初めてのアプリを作ってみますー。わたしなりに日本語訳したのでお役に立てば嬉しいです^^

参照:
https://flutter.dev/docs/get-started/codelab


(おさらい)

ちょっと忘れかけていたので、appの新規作成とsimulatorでの実行方法をおさらいしておきます。分かる人は飛ばしてください😅

appの作成

$ flutter create myapp
$ cd myapp

simulatorを起動させておく

$ flutter emulators
2 available emulators:


Galaxy_Nexus_API_29 • Galaxy Nexus API 29 • Google • android
apple_ios_simulator • iOS Simulator       • Apple  • ios

To run an emulator, run 'flutter emulators --launch '.
To create a new emulator, run 'flutter emulators --create [--name xyz]'.

You can find more information on managing emulators at the links below:
  https://developer.android.com/studio/run/managing-avds
  https://developer.android.com/studio/command-line/avdmanager
$ flutter emulators --launch apple_ios_simulator

↑でapple_ios_simulatorが起動しますー

appのrun

simulatorを起動させておいた状態で、
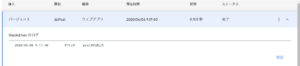
$ flutter devices
1 connected device:

iPhone 11 • E1B5593C-D161-43EC-BD9D-733A9DC10494 • ios • com.apple.CoreSimulator.SimRuntime.iOS-13-4 (simulator)
$ flutter run
Launching lib/main.dart on iPhone 11 in debug mode...

Running Xcode build...

 └─Compiling, linking and signing...                        75.9s
Xcode build done.                                           100.4s
Syncing files to device iPhone 11...                               182ms

Flutter run key commands.
r Hot reload. 🔥🔥🔥
R Hot restart.
h Repeat this help message.
d Detach (terminate "flutter run" but leave application running).
c Clear the screen
q Quit (terminate the application on the device).
An Observatory debugger and profiler on iPhone 11 is available at: http://127.0.0.1:49386/TQwM5vCq3BY=/

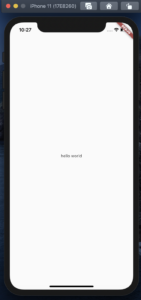
simulatorに作ったappが起動しますー

では早速、はじめてのアプリを作っていきます🍻


Step 1: Create the starter Flutter app

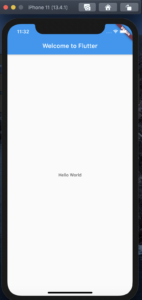
lib/main.dartを以下に書き換える

// Copyright 2018 The Flutter team. All rights reserved.
// Use of this source code is governed by a BSD-style license that can be
// found in the LICENSE file.

import 'package:flutter/material.dart';

void main() => runApp(MyApp());

class MyApp extends StatelessWidget {
  @override
  Widget build(BuildContext context) {
    return MaterialApp(
      title: 'Welcome to Flutter',
      home: Scaffold(
        appBar: AppBar(
          title: Text('Welcome to Flutter'),
        ),
        body: Center(
          child: Text('Hello World'),
        ),
      ),
    );
  }
}

  • リターンしているMaterial(App)とは…?
    モバイルおよびWebの標準であるビジュアルデザイン言語で、Flutterには、いろんなマテリアルウィジェットのセットが用意されているらしい。
  • Statelessウィジェットを拡張している(Step3でStatefulウィジェットを使います)Flutterでは、配置、パディング、レイアウトなど、ほとんどすべてがウィジェットらしい。
  • Material(App)の中のScaffoldウィジェットは、デフォルトのアプリバー、タイトル、およびホーム画面のウィジェットツリーを保持するbodyプロパティを提供する。
  • ウィジェットの主な仕事は、ウィジェットを他の低レベルのウィジェットで表示する方法を説明するbuild()メソッドを提供する。
  • この例のbodyは、Text子ウィジェットを含むCenterウィジェットで構成されていて、 Centerウィジェットは、ウィジェットサブツリーを画面の中央に配置する。

Step 2: Use an external package

外部パッケージを使う例。pub.devにあるパッケージを使うことができる様子。
今回は例として「english_words」というパッケージを追加する。

2-1. pubspec.yamlの依存リストに追加する

pubspec.yaml

dependencies:
  flutter:
    sdk: flutter
...
+ english_words: ^3.1.0

2-2. pub get(package get?) をする

Android Studioのpub getをすると、$ flutter pub getが走るっぽい。
これが完了すると、pubspec.lockにもenglish_wordsの依存バージョン情報が追記される。

小ネタ

Waiting for another flutter command to release the startup lock…
がでる時の解決策

$ flutter pub get
Waiting for another flutter command to release the startup lock...

flutterコマンドのcacheにlockfileがあるのが原因らしいので、
/flutter/bin/cache/lockfileをrmすると解決しましたー🙇‍♂️ありがたい
参考:https://qiita.com/konifar/items/29f2ed4bcc2a970014c1

2-3. lib/main.dartに追加したパッケージ(english_words)を取り込む

lib/main.dart

  import 'package:flutter/material.dart';
+ import 'package:english_words/english_words.dart';

2-4. english_wordsを使うコードを書く

lib/main.dart

               Widget build(BuildContext context) {            
+                final wordPair = WordPair.random();            
                 return MaterialApp(            
                   title: 'Welcome to Flutter',            
                   home: Scaffold(              
                       title: Text('Welcome to Flutter'),            
                     ),            
                     body: Center(            
-                      child: Text('Hello World'),            
+                      child: Text(wordPair.asPascalCase),            
                     ),            
                   ),            
                 );

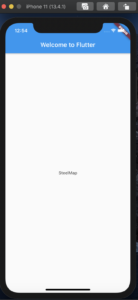
ランダムに英語の単語がキャメルケースで表示されるようになりました!
hot reload⚡️すると単語が変わるのがわかりますー


Step 3: Add a Stateful widget

今の状態はStatelessウィジェットで、その名の通り不変なためプロパティの変更ができないためStatefulウィジェットを追加しますー
Statefulウィジェットは、ウィジェットの有効期間中の変化を維持できるらしいですー
Statefulウィジェットの実装には、StatefulWidgetクラスとStateクラスが必要らしい。
StatefulWidgetクラス自体は不変だが、Stateクラスが有効期間中の変化を維持してくれるらしい。

今後、Stateクラスを作るRandomWordsのStatefulウィジェットを追加し、そのRandomWordsを既存のMyAppステートレスウィジェット内の子として使用します。

3-1. main.dartにRandomWordsStateクラスを作成する

lib/main.dart

+ class RandomWordsState extends State<RandomWords> {
+   // TODO Add build() method
+ }

State<RandomWords>はRandomWordsでの使用に特化した汎用のStateクラスを使用していることを示してるらしい。
アプリのロジックと状態のほとんどはStateにあり、RandomWordsウィジェットの状態を維持する。
このクラスは、3-2(スクロールにしたがって無限に生成したランダム単語を保存したり、単語をお気に入り登録したりする機能)で使う。

3-2. statefulなRandomWordsウィジェットをmain.dartに追加する

RandomWordsウィジェットは、Stateクラスを作成する以外にほとんど何もしません。

lib/main.dart

+ class RandomWords extends StatefulWidget {
+   @override
+   RandomWordsState createState() => RandomWordsState();
+ }

3-3. RandomWordsStateクラスのbuildメソッドを追加する

class RandomWordsState extends State {
+ @override
+ Widget build(BuildContext context) {
+   final wordPair = WordPair.random();
+   return Text(wordPair.asPascalCase);
+ }
}

3-4. MyAppから単語生成の部分のコードを取り除いて、statefulなRandomWordsウィジェットを使うようにする

lib/main.dart

class MyApp extends StatelessWidget { 
  @override 
  Widget build(BuildContext context) { 
-   final wordPair = WordPair.random(); 
    return MaterialApp( 
      title: 'Welcome to Flutter', 
      home: Scaffold( 
        title: Text('Welcome to Flutter'), 
        ... 
        body: Center( 
-         child: Text(wordPair.asPascalCase), 
+         child: RandomWords(), 
        ),
      ), 
    );
  } 
}

hot reload⚡️してもsimulatorのアプリはstep2と変わらないことを確認します。

Step 4: Create an infinite scrolling ListView

RandomWordsStateを修正して、単語リストを生成・表示する機能を追加する。
リストにListViewウィジェットを使い、ListViewのビルダーファクトリコンストラクターを使用すると、オンデマンドで遅延してリストビューを作成できるらしい。

4-1. 単語を保存する_suggestionsリストとフォントサイズを大きくする_biggerFont変数をRandomWordsStateクラスに追加する。

lib/main.dart

class RandomWordsState extends State {
+  final _suggestions = [];
+  final _biggerFont = const TextStyle(fontSize: 18.0);
  // ···
}

Unlike Java, Dart doesn’t have the keywords public, protected, and private. If an identifier starts with an underscore (_), it’s private to its library. For details, see Libraries and visibility.

「_」をつけると、dartではprivateになるらしい。

次に、RandomWordsStateクラスに単語リストを表示するListViewをbuildするbuildSuggestions()メソッドを作る。

4-2and4-3. RandomWordsStateクラスに_buildSuggestions(),_buildRow()を追加する

lib/main.dart

Widget _buildSuggestions() {
  return ListView.builder(
      padding: const EdgeInsets.all(16.0),
      itemBuilder: /*1*/ (context, i) {
        if (i.isOdd) return Divider(); /*2*/

        final index = i ~/ 2; /*3*/
        if (index >= _suggestions.length) {
          _suggestions.addAll(generateWordPairs().take(10)); /*4*/
        }
        return _buildRow(_suggestions[index]);
      }
    );
}
Widget _buildRow(WordPair pair) {
  return ListTile(
    title: Text(
      pair.asPascalCase,
      style: _biggerFont,
    ),
  );
}
  • /*1*/
    itemBuilderは単語が提案されるたびにコールバックされ、
    偶数行で、その単語をListTileの行に追加する。
    奇数(isOdd)行では、視覚的に分離するための1pxのDividerウィジェットを追加する。
  • /*4*/
    もし単語リスト_suggestionsの単語の数が上限に達したら、さらに10コの単語を生成しリストに追加する。

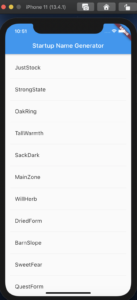
4-4. RandomWordsStateクラスbuild()メソッドで_buildSuggestions()を使うようにする。

lib/main.dart

@override
Widget build(BuildContext context) {
+  return Scaffold(
+    appBar: AppBar(
+      title: Text('Startup Name Generator'),
+    ),
+    body: _buildSuggestions(),
+  );
}

4-5. MyAppクラスのbuild()メソッドのtitleを変更し、RandomWordsウィジェットをhome直下に移動させる

lib/main.dart

class MyApp extends StatelessWidget {            
  @override            
  Widget build(BuildContext context) {         
    return MaterialApp(                        
      title: 'Startup Name Generator',            
      home: RandomWords(),                       
    );            
  }
}


最後に

つぎはPart2で、スクロールとお気に入り登録機能を追加します!がんばりまーす🙌

最近よくみるFlutterでHello Worldしてみる


外出自粛GW暇ですねー、なのでFlutter触ってみることにしました💡
フラッターて読むんですかね、フルッターてずっと読んでました。

参考:
https://flutter.dev/docs/get-started/install/macos
https://apps-gcp.com/cloud-pub-sub-dead-letter-topic/

環境構築

入れるものがまあまあ多い印象ですが、思ったよりはすぐできました。

私の環境

  • macOS Catalina 10.15.4
  • Xcodeは古いのは入ってた(今回バージョン最新にしました)
  • Android Studioは入ってない

したこと

https://flutter.dev/docs/get-started/install/macos
ほぼ、↑の通りにしました。英語は優しいので導入しやすかったです。

  • Flutter SDKの導入
  • Xcodeを最新の11にupdate
  • iOS Simulatorのset up
  • Android Studioのインストール
  • Android Emulatorのset up ←ちゃんとできてないかも…
  • VSCode ←AndroidStudioがあればコードかけるけど念のため入れた


Flutter SDKの導入

GitからFlutterSDKをゲット
git clone https://github.com/flutter/flutter.git -b stable
私はbashを使っているので、~/.bash_profileを編集して、flutterコマンドのパスを通す。(source 忘れないように!)

確認してみる。

$ flutter --version
Flutter 1.12.13+hotfix.9 • channel stable • git://github.com/flutter/flutter.git
Framework • revision f139b11009 (5 weeks ago) • 2020-03-30 13:57:30 -0700
Engine • revision af51afceb8
Tools • Dart 2.7.2
...
Xcodeのアップデート

itunesから最新Xcodeにアップデートして、以下のコマンドでrunしてlisenceに同意する。

$ sudo xcode-select --switch /Applications/Xcode.app/Contents/Developer
Password:
$ sudo xcodebuild -runFirstLaunch


You have not agreed to the Xcode license agreements. You must agree to both license agreements below in order to use Xcode.

Hit the Return key to view the license agreements at '/Applications/Xcode.app/Contents/Resources/English.lproj/License.rtf'

Xcode and Apple SDKs Agreement

PLEASE SCROLL DOWN AND READ ALL OF THE FOLLOWING TERMS AND CONDITIONS CAREFULLY BEFORE USING THE APPLE SOFTWARE OR APPLE SERVICES.  THIS IS A LEGAL AGREEMENT BETWEEN YOU AND APPLE.  IF YOU AGREE TO BE BOUND BY ALL OF THE TERMS AND CONDITIONS, CLICK THE “AGREE” BUTTON.  BY CLICKING “AGREE” OR BY DOWNLOADING, USING OR COPYING ANY PART OF THIS APPLE SOFTWARE OR USING ANY PART OF THE APPLE SERVICES, YOU ARE AGREEING ON YOUR OWN BEHALF AND/OR ON BEH
...

By typing 'agree' you are agreeing to the terms of the software license agreements. Type 'print' to print them or anything else to cancel, [agree, print, cancel] agree

You can view the license agreements in Xcode's About Box, or at /Applications/Xcode.app/Contents/Resources/English.lproj/License.rtf

Install Started
1%.........20.........40.........60.........80.........Install Succeeded
iOS Simulatorのセットアップ

以下コマンドでiOS Simulatorを開く
open -a Simulator
File > Open Device より適当なデバイスを選んで、開いて確認してみる。

Flutter アプリを作成してみる

flutter runをすると、さっき開いていたiOS Simulatorに、作成したmy_app_flutterが開きました。

$ flutter create my_app_flutter
$ cd my_app_flutter
$ flutter run

Launching lib/main.dart on iPhone 11 Pro in debug mode...
Running Xcode build...

 ├─Assembling Flutter resources...                           9.0s
 └─Compiling, linking and signing...                         6.3s
Xcode build done.                                           21.8s
Syncing files to device iPhone 11 Pro...
 5,738ms (!)

🔥  To hot reload changes while running, press "r". To hot restart (and rebuild state), press "R".
An Observatory debugger and profiler on iPhone 11 Pro is available at: http://127.0.0.1:61543/7ohrboNLAIo=/
For a more detailed help message, press "h". To detach, press "d"; to quit, press "q".

「Hello world」してみる

Editorは、Android Studioを使いました。

my_app_flutter/lib/main.dart

import 'package:flutter/material.dart';

void main() {
 runApp(App());
}

class App extends StatelessWidget {
 @override
 Widget build(BuildContext context) {
   return MaterialApp(
     home: Scaffold(
       body: Center(child: Text("hello world")),
     ),
   );
 }
}

上記に書き換えて、既にiOS Simulatorを開いている状態では、
⚡️マークのhot reloadをすると、runしなくても更新してくるようです。

できたー!


最後に

Android Emulatorもいれたので、試したかったんですがMacユーザのためAndroidの操作法がわからず🤔
と思ったら、AndroidでもEmulatorできましたー!(ヘッダーとフッターは追加しました。)

次は何かできるアプリを作成したいです!!!

Symfony installerを削除して、Symfony CLI(symfonyコマンド)を入れて使ってみる!


お久しぶりです☺️

Symfonyを使っているにもかかわらず、symfonyコマンド使ってないなー
と今更感じたので、この記事を書きます。


はじめに

私の場合、Symfony2,3で使っていたSymfony installerを削除する必要がありました。
symfonyというコマンド名でバッテングしてるので、Symfony4からdepricatedになったSymfony installerを削除→Symfony CLIをインストールという手順をしました。
(※ composerを使えば良い話なんですが、symfonyコマンド使ってみたかったので)

Symfony installerが入っている状態

$ symfony

Symfony Installer (1.5.11)
==========================

This is the official installer to start new projects based on the
Symfony full-stack framework.
...


ここで、symfony new でプロジェクトを作成しようとすると、
Symfony InstallerはSymfony4から互換性(compatible)なくなったよーって言われました。
また、Symfony4から代わりにcomposer create-project symfony/skeleton [my_project_name]を使ってねーって言ってます。

$ symfony new my_project
PHP Warning: "continue" targeting switch is equivalent to "break". Did you mean to use "continue 2"? in phar:///usr/local/bin/symfony/vendor/guzzlehttp/ringphp/src/Client/CurlFactory.php on line 363
PHP Stack trace:

...

[RuntimeException]
The Symfony Installer is not compatible with Symfony 4.x or newer versions.
Run this other command to install Symfony using Composer instead:
composer create-project symfony/skeleton my_project

一瞬、Symfony4からsymfonyコマンドなくなった?って思いましたが、Symfony4.4のBestPracticeでしっかり使っているので、少し混乱しました😅
参考:


SymfonyInstallerを削除して、SymfonyCLIをinstallする。

あまり良くない消し方な気がしますが、以下の方法でSymfonyInstallerを消しました。

$ ls -al ~/.symfony
total 0
drwxr-xr-x 3 watashi staff 96 4 4 20:51 .
drwxr-xr-x+ 118 watashi staff 3776 4 20 18:45 ..
drwxr-xr-x 3 watashi staff 96 4 21 09:23 bin
$ ls -al /usr/local/bin/symfony
-rwxr-xr-x 1 watashi staff 246243 7 4 2019 /usr/local/bin/symfony
$ rm -rf ~/.symfony
$ rm -rf /usr/local/bin/symfony
$ symfony -V
-bash: /usr/local/bin/symfony: No such file or directory

そして、SymfonyCLIをインストールします🚀

$ curl -sS https://get.symfony.com/cli/installer | bash
Symfony CLI installer

Environment check
[*] cURL is installed
[*] Gzip is installed
[*] Git is installed
[*] You architecture (amd64) is supported

Download
Finding the latest version (platform: "darwin_amd64")...
Downloading version 4.14.1 (https://github.com/symfony/cli/releases/download/v4.14.1/symfony_darwin_amd64.gz)...
% Total % Received % Xferd Average Speed Time Time Time Current
Dload Upload Total Spent Left Speed
100 636 100 636 0 0 1311 0 --:--:-- --:--:-- --:--:-- 1311
100 7909k 100 7909k 0 0 878k 0 0:00:09 0:00:09 --:--:-- 1443k
Uncompress binary...
Making the binary executable...
Installing the binary into your home directory...
The binary was saved to: /Users/watashi/.symfony/bin/symfony

The Symfony CLI v4.14.1 was installed successfully!

Use it as a local file:
/Users/watashi/.symfony/bin/symfony

Or add the following line to your shell configuration file:
export PATH="$HOME/.symfony/bin:$PATH"

Or install it globally on your system:
mv /Users/watashi/.symfony/bin/symfony /usr/local/bin/symfony

Then start a new shell and run 'symfony'

$ mv /Users/watashi/.symfony/bin/symfony /usr/local/bin/symfony

うぉー!Symfony CLIが入りましたー!!! 🎉

$ symfony
Symfony CLI version v4.14.1 (c) 2017-2020 Symfony SAS
Symfony CLI helps developers manage projects, from local code to remote infrastructure

These are common commands used in various situations:

Work on a project locally

new Create a new Symfony project
serve Run a local web server
server:stop Stop the local web server
security:check Check security issues in project dependencies
composer Runs Composer without memory limit
console Runs the Symfony Console (bin/console) for current project
php, pecl, pear, php-fpm, php-cgi, php-config, phpdbg, phpize Runs the named binary using the configured PHP version

Manage a project on Cloud

login Log in with your SymfonyConnect account
init Initialize a new project using templates
link Link current git repository to a SymfonyCloud project
projects List active projects
envs List environments
env:create Create an environment
tunnel:open Open SSH tunnels to the app's services
ssh Open an SSH connection to the app container
deploy Deploy an environment
domains List domains
vars List variables
user:add Add a user to the project

Show all commands with symfony help,
Get help for a specific command with symfony help COMMAND.


Symfony CLIを使ってみる

プロジェクトを作成してみます。
今回は、webアプリケーションを作ってみます。
composer create-project symfony/website-skeleton [project_name]git initをしていることがわかります。

$ symfony new symfony_command_test_web_app --full
* Creating a new Symfony project with Composer
  (running /usr/local/bin/composer create-project symfony/website-skeleton /Users/watashi/symfony_command_test_web_app)

* Setting up the project under Git version control
  (running git init /Users/watashi/symfony_command_test_web_app)


 [OK] Your project is now ready in /Users/watashi/symfony_command_test_web_app


symfony server:startを使ってローカルサーバを立てて、ブラウザを確認してみると…いい感じにSymfony5.0.8のwelcomeページが表示されましたー!🍺

$ symfony server:start

 [WARNING] run "symfony server:ca:install" first if you want to run the web server with TLS support, or use
 "--no-tls" to avoid this warning


Apr 29 11:13:01 |DEBUG| PHP    Reloading PHP versions
Apr 29 11:13:01 |DEBUG| PHP    Using PHP version 7.3.11 (from default version in $PATH)
Apr 29 11:13:01 |INFO | PHP    listening path="/usr/sbin/php-fpm" php="7.3.11" port=55287
Apr 29 11:13:01 |DEBUG| PHP    started
Apr 29 11:13:01 |INFO | PHP    'user' directive is ignored when FPM is not running as root
Apr 29 11:13:01 |INFO | PHP    'group' directive is ignored when FPM is not running as root
Apr 29 11:13:01 |INFO | PHP    fpm is running, pid 3483
Apr 29 11:13:01 |INFO | PHP    ready to handle connections

 [OK] Web server listening
      The Web server is using PHP FPM 7.3.11

      http://127.0.0.1:8000


symfony server:ca:installをしたら、TLSで確認できるらしいので、入れてみる🔐
を「https://」になったー!ブラウザもちゃんとみれる👀

$  symfony server:start
Apr 29 11:29:01 |DEBUG| PHP    Reloading PHP versions
Apr 29 11:29:02 |DEBUG| PHP    Using PHP version 7.3.11 (from default version in $PATH)
Apr 29 11:29:02 |INFO | PHP    listening path="/usr/sbin/php-fpm" php="7.3.11" port=55368
Apr 29 11:29:02 |DEBUG| PHP    started
Apr 29 11:29:02 |INFO | PHP    'user' directive is ignored when FPM is not running as root
Apr 29 11:29:02 |INFO | PHP    'group' directive is ignored when FPM is not running as root
Apr 29 11:29:02 |INFO | PHP    fpm is running, pid 12395
Apr 29 11:29:02 |INFO | PHP    ready to handle connections

 [OK] Web server listening
      The Web server is using PHP FPM 7.3.11

      https://127.0.0.1:8000


さいごに

今までは、composerでプロジェクトを作って、php -S 127.0.0.1:8880 -t public/でブラウザ確認をしていたので、symfonyコマンドの方が短いので使って楽したほうがいいなーと思いました。


SpotifyAPIを使いプレイリストを簡単に作成してくれるツールDJ-Kin29リニューアルしました!

以前に作成した、アーティスト名を入力するだけでいい感じのSpotifyプレイリストを作成してくれるツールDJ-Kin29を改良しました!

是非、使ってみてください!!!
https://dj-kin29.herokuapp.com/

今回の改良にあたって、認可フローを見直しました。
前回の記事でまとめたので、よかったら参考にしてください。
SpotifyWebAPIの認可フローをまとめてみた

Githubも公開しまーす。
コントリビュート待ってます🍺
https://github.com/kin29/dj-kin29

Before

  • プレーンなPHP
  • Spotify認可のタイミングがフォームを入力後というおかしなタイミング
入力フォーム (index.php)
↓
↓ 作成 (旧:action先=create.php)
↓
(spotifyの認可画面)
redirect_uri: https://dj-kin29.herokuapp.com/create.php
→ 拒否されたら、 https://{redirect_uri}?error=access_denied
↓
↓ 許可されたら、
↓
プレイリスト作成成功
プレイリスト作成完了画面 (complete.php)
or
プレイリスト作成失敗
プレイリスト作成失敗画面 (failed.php)
↓
↓ more create / retry
↓
入力フォーム (index.php)に戻る

After

  • Symfony4を使用
  • Spotify認可のタイミングを、フォーム入力前にした。
1. / (クエリパラメータにcode=xxxを含まない)
- 「Authorization to Spotify」ボタンで、Spotifyとの連携(認可)をスタートする。(リンク先:/auth_spotify)
※ボタン押さずとも連携スタートさせたかったけど、spotify側の認可URLにリダイレクトさせてたらTwitterカードPreviewでエラーになったので、やめました😓

2. /auth_spotify
- Spotifyの認可がスタートする
  - 認可を許可したことがある場合:リダイレクトURL (/code=xxx)に遷移する。
  - 許可していない場合:Spotifyログイン画面 or 認可しますか画面に遷移する。
    - 認可の許可をした場合:/code=xxxにリダイレクトする。
    - 認可を拒否した場合:/error=xxx(エラーページ)にリダイレクトする。(→Re-Tryボタンで再チャレンジ可能)

3. /code=xxx
- フォーム画面。post先は、/create。

4. /create
- SpotifyWebAPIを使って、プレイリストを作成する。
  - 作成成功した場合;完了画面
  - 作成失敗した場合;失敗画面(→Re-Tryボタンで再チャレンジ可能)
- 「More create」ボタンでさらにプレイリスト作成可能(2に戻る)

さいごに

  • Tweetボタン設置しました^^
  • GAを充実させたくて、GTMと格闘しました。
  • 引き続きherokuを使っているので、初動に時間がかかります、、、🙇‍♂️
  • アーティスト名検索では、該当するアーティストの一番上だけを取得し、それに紐付く曲を取得するので、アーティスト名が被っていると期待したプレイリストができないことがあります、、、🙇‍♂️
    (日本のガールズバンドHumpBackのつもりで入力したところ、まだサブサクは解禁してないようで、違うバンドの曲が入っていました。)


SpotifyWebAPIの認可フローをまとめてみた

以前、
SpotifyAPIでクイックプレイリスト作成ツールを作ってみた

で簡単にSpotifyWebAPIの使い方を紹介しましたが、今回リニューアルに向けてSpotifyWebAPIの認可フローをまとめてみました!!!
(ちょい長めなので、飽きないように絵文字多めでうざいかもしれませんw)

公式ドキュメント:https://developer.spotify.com/documentation/general/guides/authorization-guide/
のほとんど和訳みたいな感じですが…😅

Spotify APIを使うフローは3つあります。

  • Authorization Code
    リフレッシュ可能なユーザ認可。エンドユーザ情報にアクセスするAPIエンドポイント(プレイリスト作成も可能)もアクセスできる。
  • Implicit Grant Flow
    一時的なユーザ認可。JavaScriptを使いエンドユーザブラウザで実行される。サーバ側のコードを使用しないアプリ向け、refresh_tokenの提供なし。
  • Client Credentials Flow
    リフレッシュ可能なアプリ認可。サーバ間認証で、エンドユーザ情報にアクセスにしないAPIエンドポイントのみにアクセスできる。

今回はPHPを使う想定で、
Authorization Codeについての詳細を紹介します!!!

Spotify Web APIでつかうURLは2つあります。

  • https://accounts.spotify.com
    Spotifyアカウント(ユーザ認可)へのAPI用👦
  • https://api.spotify.com/
    それ以外(アーティスト・プレイリスト・トラックなど)のSpotifyサービスへのAPI用🎧

ざっくりとした流れは、以下stepになります。

1.認可リクエスト🙇‍♂️

GET https://accounts.spotify.com/authorize

<クエリパラメータ>

クエリパラメータ
client_id SpotifyのDeveloperにあるやつ(必須)
response_type "code"をセットする。(必須)
redirect_uri SpotifyのDeveloperより設定したRedirect URIsと同じものにする(必須)
status ランダム文字列をセットをすると、リクエストとレスポンスが妥当かの確認できて、クロスサイトリクエストフォージェリなどの攻撃に対する保護ができる。[RFC-6749](推奨)
scope デフォルトはSpotifyデスクトップやweb、モバイルプレーヤで通常表示される情報のみアクセスを許可する設定になる。
詳細は、Authorization Scopes
show_dialog [default:false] falseの場合、一度承認すると自動でredirect_uriにリダイレクトする。trueの場合、既に承認していてもredirect_uriにリダイレクトされず、再度認証を

具体例

GET https://accounts.spotify.com/authorize?client_id=5fe01282e44241328a84e7c5cc169165&response_type=code&redirect_uri=https%3A%2F%2Fexample.com%2Fcallback&scope=user-read-private%20user-read-email&state=34fFs29kd09

をすると、

  1. クエリパラメータ指定のscopeについて、エンドユーザに認可していいか尋ねる
    • エンドユーザがログインしていない場合:ログインを求める
    • エンドユーザがログイン済の場合:スコープについてのデータアクセスへの許可/拒否かを聞く
  2. エンドユーザはredirect_uriにリダイレクトされる
    • エンドユーザが認可を許可した場合🙆‍♂️:
      codeとstate(リクエストで指定してた時のみ)がクエリパラメータとして返ってくる。
    • code:access_tokenと交換できる認証コード
      例)https://example.com/callback?code=NApCCg..BkWtQ&state=profile%2Factivity

    • エンドユーザが認可を拒否した場合🙅‍♂️:
      errorとstate(リクエストで指定してた時のみ)
    • error:認可失敗の理由
      例)https://example.com/callback?error=access_denied&state=STATE

2.refresh_tokenとaccess_tokenをリクエストする🔑

認可コード(code=xxxx)を受け取った後、認可コードとaccess_tokenを交換するためにリクエストする

POST https://accounts.spotify.com/api/token

<リクエストボディパラメータ>
OAuth 2.0で定義されたapplication/x-www-form-urlencodedでエンコードされたパラメータを含ませる必要がある。

リクエストボディパラメータ
grant_type "authorization_code"をセットする(必須)
code 1で取得したcodeをセットする(必須)
redirect_uri 妥当性の検証に使用されるだけで、リダイレクトはしない。1でリクエストしたredirect_uriと一致する必要がある(必須)
client_idとclient_secret もしくはヘッダーパラメータにAuthorization: Basic <?php base64_encode(client_id:client_secret)>を含める(必須)

<レスポンスデータ>

レスポンスデータ
access_token 今後のSpotifyWebAPIサービスを利用するためのaccess_token
token_type "Bearer"
scope access_tokenに付与されたscope、スペース区切りのリスト文字列
expires_in access_tokenの有効な期間(秒単位)
refresh_token access_tokenが期限切れになった時、新しいaccess_tokenを得るために必要となるっぽい

3. access_tokenを使って、SpotifyWebAPIへアクセスする🎧

2で受け取ったaccess_tokenを使用(ヘッダーにセット)し、リファレンスに沿ってリクエストをするとで、ユーザに代わってSpotifyWebAPIにリクエスト/レスポンス(JSON)を受け取ることができる。

例)
curl -H "Authorization: Bearer {access_token}" https://api.spotify.com/v1/me

Web API Reference
https://developer.spotify.com/documentation/web-api/reference-beta/#endpoint-check-current-user-follows

4.access_tokenをリフレッシュする方法✨

access_tokenは、しばらくすると意図的に期限切れになります。
その後、認可コードとの交換で最初に取得したrefresh_tokenを使用して新しいaccess_tokenをもらう。

POST https://accounts.spotify.com/api/token

<リクエストボディパラメータ>
OAuth 2.0で定義されたapplication/x-www-form-urlencodedでエンコードされた、リクエストボディパラメータを含ませる。

  • grant_type:refresh_tokenをセットする(必須)
  • refresh_token:認可コード交換の時に返されたrefresh_tokenをセットする

<へッダーパラメータ>

  • Authorization:Authorization: Basic <?php base64_encode(client_id:client_secret)>(必須)

まとめ

改めて日本語でまとめてみると、ユーザ情報にもアクセスするのでセキュリティ面で考えることもできました。

  • statusをセットした方が、安全そう
  • client_secretなどの他人にバレてはやばそうな情報を使ったリクエストを送る時はOAuth 2.0で定義されたapplication/x-www-form-urlencodedでエンコードしてる
  •  


PHPerKaigi2020前夜祭だけ行ってきたよー!

お久しぶりです!PHPerKaigi2020前夜祭だけ行ってきましたー!
(1日目は月曜平日なので、チキってしまいました。)
名古屋-東京って新幹線ですぐなのに、片道一万もするのどうにかならないですかねえ😌

間違えてペチコンの流れで京急蒲田にむかっておりました。品川で気づかされました。

さて、入場してもらえたもの(勝手にピックアップ)

  • トートバッグ(ジーパン生地かわいい)
  • 名札
  • トレンディングカード(プロフィール登録ミスっててアイコンがない…)
  • GameWithさんのモバイルバッテリー(これはありがたいです🙇‍♂️)
  • デジタルサーカスさんの熱伝導式のアイススプーン(ほんとにカチカチのアイス食べやすかったです)
  • GMOさんのチョコ

参加したセッション

Deep module in PHP

前提:いいコード=複雑じゃないコード
=内容を理解するのが簡単で、変更するのが大変ではない とする

どうやって複雑で名はないコードを書くか?
→ Deep module

Deep module とは?
- モジュール設計の考え方
- 様々な角度から複雑さを減らす方法 例)技術的負債、抽象化、エラー

モジュールとは?
→インターフェイスと実装をもつあらゆるレベルにおけるコードの塊

インターフェイスとは?
→他のモジュールがそのモジュールを呼び出すために知る必要があるもの

理想のモジュール
→多くの機能を提供しながら、インターフェイスはシンプルなもの

Deep module ⇔ shallow  module

- moduleが深くなることを目指す
  - 抽象化することを意識する
    重要ではない実装の詳細を隠すことで、インターフェイスをシンプルにできるかつ多機能の両立ができる
  - 可能な限り、一般的なケースに最適化された設計を行う

deep moduleの具体例🙆‍♂️
- CakePHPのsaveメソッド …詳細を知らなくてもデータを保存できる
  - エンティティ渡すだけでよい →シンプルなインターファイス
  - インサートかアップデートかどちらかをよしなにしてくれる →多機能(cakePHPでは、save時にcreated/modifiedをするか自動で決めるのは一般的な機能)
  ↑ある種の決めつけで、インターフェイスをシンプルにしている
  - データベースの種類を意識する必要がない →抽象化

shallow moduleの具体例より🙅‍♂️
小さなモジュールだけど、インターフェイス(メソッド名)に実装詳細がダダ漏れしている。
エンティティ操作をするサブクラスだが、直接エンティティから操作したほうが早い。
→ インターフェイスのコストが、機能の利益を上回っている

しかし、小さい(モジュール)はいいことなのでは?
例) Sandy metzルール(クラス内コードは100行以内、メソッドは5行以下) ←Ruby

↓

小さいことはNot Shallow!
- モジュールが小さいと持っている情報量が少なく、多機能ではないから
→何でもかんでもメソッド化するのは良くない

- 1つのメソッド内に大量のコードが書かれると読みづらい
→ 実装が膨れたら、適宜メソッドに分割する


まとめ

Deep moduleとは、、、
インターフェイスがシンプルで、多機能なモジュール
このモジュールはDeepか?という問いにを立てながらコードを書くと良いコードになるかも

マルチパラダイムモデリング

- オブジェクトの歴史

  - 構造化プログラミング     
  - モジュラープログラミング
   ↓
  - データ抽象
    ↓ データ抽象を実現する手段の一つとして提唱されたのが、抽象データ型
  - 抽象データ型
   ↓ さらに、抽象データ型の具体的実装としてクラスに多くの機能を導入
  - クラス 🌟モジュール化の手法のひとつ!
  
  - ここまでのまとめ: クラスベースのオブジェクト指向におけるソフトウェア構築は、抽象データ型の構造化された集合としてシステムを構築すること

- マルチパラダイム・モデリング
  - 関数を他のデータ型同様に扱うことによって、モジュール間の依存関係を適切にできる可能性がある。(関数がファーストクラスオブジェクトである)🤔
  - 抽象データ型は、データ構造を隠蔽するため、データモデルの理解は必要不可欠🤔

- 計算モデル
  - チューリングマシーンとは?...チューリングさんが提唱した

>「計算可能性」に関する議論のために提示した抽象機械である。

調べたけど[宇宙一わかりやすい](https://www.yukisako.xyz/entry/turing-machine)でもわからなかった、、

  - (帰納的関数、よくわかってない...)

- 計算モデルとしてのデータモデル

  - データモデルを用いることで計算を行いやすくなるという意味で計算モデルとみなすことができる
  
    例)リレーショナルモデル → リレーショナル演算
  
  - ただし、チューリング完全であるとは限らない🤔
  
  - リレーショナルモデルとERモデル
  
    - リレーショナルモデル ...述語理論、なんらかの命題を満たす事実の集合を捉えるデータモデル。関係演算によるデータ操作が可能になる。
    
    - ERモデルはリレーショナルモデルではない?
      - リレーショナルモデル 計算携帯持つ
      - ERモデル それ自体は計算携帯をもたない。複数のデータモデルの包括的なビュー。

私のレベルではちょっと難しいお話でした...勉強します...

Inside SWOOLE:非同期処理はどのようにして動くのか

- swooleとは?
  - PHPで非同期処理を実現できる機能拡張
  - 2012年~
  - Transfonさんによって
  - 中国の開発者が猛烈

- 非同期処理
  - 並行/並列
  - コルーチン?

- C++でできている

- swooleまだまだ開発環境レベルでしか使用できてない、本番で使ってる例は少なそう。(会場内で使ってるのは、uzullaさんと郡山さんくらいだった)

BEAR.Sundayのマニュアルにもswooleが追加されていたので気になってました。

感想

  • トレンディングカードもっと交換したかった😭(切実)
  • フェスみたいに一日券が欲しい。
    例)前夜祭のみとか、1日目のみなど
  • 地方枠でちょい安なチケットが欲しい。(現在地証明が難しそうだけど)
  • もっと勉強しよ…

とはいっても、とても楽しかったです!実行委員のみなさんありがとうございました🙇‍♂️
来年も楽しみにしています!!!

Symfony4をHerokuにデプロイしてみる


Symfony Advent Calendar 2019の14日目です。(間に合わすつもりでしたが、過ぎてしまいました…)


ほとんど、Herokuのドキュメント通りですが、 Apache設定に関して忘れがちなので同じ経験をしている方の助けになればと思います!

Githubにコミットしてるので、参考にどうぞ!
kin29/symfony4-heroku


使うもの

– Symfony4.4
– Heroku (Apacheを想定)


確認事項

Symfony4.4はPHP7.1.3以上が必要です。

$ php -v  //ローカルのPHPのバージョンを確認
PHP 7.1.30 (cli) (built: Jul 4 2019 21:55:42) ( NTS )


※ 今のHerokuのデフォルトPHPバージョンは7.3.12でした!

-----> PHP app detected
-----> Bootstrapping...
-----> Installing platform packages...
       - php (7.3.12)
       - apache (2.4.41)
       - nginx (1.16.1)


手順

1.composer経由でプロジェクトの作成

$ composer create-project symfony/website-skeleton symfony4-heroku/

ビルドインサーバーを立ててローカルで確認してみる。

$ cd symfony4-heroku/
$ php -S 127.0.0.1:8888 -t public/

welcomeページ見れましたー!


2.Herokuにデプロイしてみる

Githubにpushして、masterをdeployしてみます。

なんかエラーになって、deployできない。

...
     Script cache:clear returned with error code 255
       !!  Symfony\Component\ErrorHandler\Error\ClassNotFoundError {#29
       !!    #message: """
       !!      Attempted to load class "WebProfilerBundle" from namespace "Symfony\Bundle\WebProfilerBundle".\n
       !!      Did you forget a "use" statement for another namespace?
       !!      """
       !!    #code: 0
       !!    #file: "./src/Kernel.php"
       !!    #line: 23
       !!    trace: {
       !!      ./src/Kernel.php:23 {
       !!        App\Kernel->registerBundles(): iterable
       !!        › if ($envs[$this->environment] ?? $envs['all'] ?? false) {
       !!        ›     yield new $class();
       !!        › }
       !!      }
       !!      ./vendor/symfony/http-kernel/Kernel.php:449 { …}
       !!      ./vendor/symfony/http-kernel/Kernel.php:133 { …}
       !!      ./vendor/symfony/framework-bundle/Console/Application.php:169 { …}
       !!      ./vendor/symfony/framework-bundle/Console/Application.php:75 { …}
       !!      ./vendor/symfony/console/Application.php:148 { …}
       !!      ./bin/console:42 { …}
       !!    }
       !!  }
       !!  2019-12-14T12:26:54+00:00 [critical] Uncaught Error: Class 'Symfony\Bundle\WebProfilerBundle\WebProfilerBundle' not found
       !!  
       Script @auto-scripts was called via post-install-cmd
 !     WARNING: There was a class not found error in your code
 !     ERROR: Dependency installation failed!
 !     
 !     The 'composer install' process failed with an error. The cause
 !     may be the download or installation of packages, or a pre- or
 !     post-install hook (e.g. a 'post-install-cmd' item in 'scripts')
 !     in your 'composer.json'.
 !     
 !     Typical error cases are out-of-date or missing parts of code,
 !     timeouts when making external connections, or memory limits.
 !     
 !     Check the above error output closely to determine the cause of
 !     the problem, ensure the code you're pushing is functioning
 !     properly, and that all local changes are committed correctly.
 !     
 !     For more information on builds for PHP on Heroku, refer to
 !     https://devcenter.heroku.com/articles/php-support
 !     
 !     REMINDER: the following warnings were emitted during the build;
 !     check the details above, as they may be related to this error:
 !     - There was a class not found error in your code
 !     Push rejected, failed to compile PHP app.
 !     Push failed


herokuのdeployではcomposer require-devのほうは、インストールしてくれないそうなので、symfony/profiler-packがないよーって言っています。

横着ですが、
require-devのパッケージを、requireの方にも入れます。

       !!  Symfony\Component\ErrorHandler\Error\ClassNotFoundError {#29
       !!    #message: """
       !!      Attempted to load class "WebProfilerBundle" from namespace "Symfony\Bundle\WebProfilerBundle".\n
       !!      Did you forget a "use" statement for another namespace?
       !!      """


こっちも、composer.jsonのscript部分の消しちゃって逃げます💦

-    "scripts": {
-        "auto-scripts": {
-            "cache:clear": "symfony-cmd",
-            "assets:install %PUBLIC_DIR%": "symfony-cmd"
-        },
-        "post-install-cmd": [
-            "@auto-scripts"
-        ],
-        "post-update-cmd": [
-            "@auto-scripts"
-        ]
-    },

で、どうにかHerokuにデプロイできるようになりました😎


3.env=prodにする

heroku config:set APP_ENV=prod --app [herokuのapp名]

4.Apacheの設定 ←ここ大事💡

以下コマンドでProcfileを作成します。

$ echo 'web: heroku-php-apache2 public/' > Procfile

さらに、composer require apache-packを実行し、質問にはyesで答えます。
そうすると、.htaccessが追加されます。

git pushしてherokuにdelpoyされたら、ブラウザで確認してみます。
env=prodでは、welcomeページはないので404になります。


5.コントローラー作成

下記コマンドで、コントローラを作成することができます。

$ php bin/console make:controller HogeController

 created: src/Controller/HogeController.php
 created: templates/hoge/index.html.twig

           
  Success! 
           

 Next: Open your new controller class and add some pages!

deploy後にheroku bashで、routerを一応確認してみます。良さそう😏

~ $  bin/console debug:router
 ------ -------- -------- ------ -------
  Name   Method   Scheme   Host   Path
 ------ -------- -------- ------ -------
  hoge   ANY      ANY      ANY    /hoge
 ------ -------- -------- ------ -------

6.ブラウザチェック

作成した/hogeにアクセスしてみると、、、見れたー!!!!!🎉

つまづきポイント

deployできたはずなのに、herokuでsymfonyコマンド使ってみると、 最初のエラーが再び….
Attempted to load class “WebProfilerBundle” from namespace “Symfony\Bundle\WebProfilerBundle”.\n
Did you forget a “use” statement for another namespace?
heroku run bashして、サーバに入ってrm -rf vendor/からのcomposer installでどうにかsymfonyコマンドは動作するようになりました。


参考

https://devcenter.heroku.com/articles/deploying-symfony4
https://github.com/heroku/heroku-buildpack-php/issues/278#