Jest + TypeScript でテストできるようにする


TypeScriptのテストといえばJestなのかな?と思って導入してみました!
JavaScriptのみの場合は簡単だったんですが、TypeScriptの時はちょっと手こずったので残します😇

Jestとは❓

https://jestjs.io/docs/getting-started

導入手順📲

1️⃣ Jestをinstallする(JavaScriptテスト実行はここまででok👌)

$ npm install --save-dev jest
$ vi package.json //npm testでテスト実行できるようにする
{
  "devDependencies": {
    "jest": "^27.5.1"
- }
+ },
+ "scripts": {
+   "test": "jest"
+ }
}

$ npm test //JSのテスト実行できた〜🙌🙌🙌

> test
> jest

 PASS  ./sum.test.js
  ✓ adds 1 + 2 to equal 3 (2 ms)

Test Suites: 1 passed, 1 total
Tests:       1 passed, 1 total
Snapshots:   0 total
Time:        0.48 s
Ran all test suites.

2️⃣ TypeSciptでもJestでテスト実行できるようにする

TypeScriptだと以下のエラーが出たので調整する

$ npm test

> test
> jest

 FAIL  ./ts-sum.test.ts
  ● Test suite failed to run

    Jest encountered an unexpected token

    Jest failed to parse a file. This happens e.g. when your code or its dependencies use non-standard JavaScript syntax, or when Jest is not configured to support such syntax.

    Out of the box Jest supports Babel, which will be used to transform your files into valid JS based on your Babel configuration.

    By default "node_modules" folder is ignored by transformers.

    Here's what you can do:
     • If you are trying to use ECMAScript Modules, see https://jestjs.io/docs/ecmascript-modules for how to enable it.
     • If you are trying to use TypeScript, see https://jestjs.io/docs/getting-started#using-typescript
     • To have some of your "node_modules" files transformed, you can specify a custom "transformIgnorePatterns" in your config.
     • If you need a custom transformation specify a "transform" option in your config.
     • If you simply want to mock your non-JS modules (e.g. binary assets) you can stub them out with the "moduleNameMapper" config option.

    You'll find more details and examples of these config options in the docs:
    https://jestjs.io/docs/configuration
    For information about custom transformations, see:
    https://jestjs.io/docs/code-transformation

    Details:

    /Users/kin29/jest-test/ts-sum.test.ts:1
    ({"Object.":function(module,exports,require,__dirname,__filename,jest){import { TsSum } from "./ts-sum";
                                                                                      ^^^^^^

    SyntaxError: Cannot use import statement outside a module

      at Runtime.createScriptFromCode (node_modules/jest-runtime/build/index.js:1728:14)

 PASS  ./sum.test.js

Test Suites: 1 failed, 1 passed, 2 total
Tests:       1 passed, 1 total
Snapshots:   0 total
Time:        1.04 s
Ran all test suites.

tscコマンドをinstallする

//tscコマンドをinstall
$ npm i typescript -g
$ tsc --version
Version 4.6.2

//tsconfig.jsonを作成
$ tsc -init

Created a new tsconfig.json with:                                                                                       
                                                                                                                     TS 
  target: es2016
  module: commonjs
  strict: true
  esModuleInterop: true
  skipLibCheck: true
  forceConsistentCasingInFileNames: true


You can learn more at https://aka.ms/tsconfig.json
$ npm install --save-dev ts-jest @types/jest typescript
$ jest --init //jest.config.tsを作成

The following questions will help Jest to create a suitable configuration for your project

✔ Would you like to use Typescript for the configuration file? … yes
✔ Choose the test environment that will be used for testing › node
✔ Do you want Jest to add coverage reports? … no
✔ Which provider should be used to instrument code for coverage? › v8
✔ Automatically clear mock calls, instances and results before every test? … no

📝  Configuration file created at /Users/kin29/jest-test/jest.config.ts

$ vi jest.config.ts
- // transform: {}
+ transform: {
+   '.*\\.(ts)$' : '/node_modules/ts-jest',
+ },

TypeScriptでもテスト実行できるようになった〜🎉🎉🎉

$ npm test

> test
> jest

 PASS  ./sum.test.js
 PASS  ./ts-sum.test.ts

Test Suites: 2 passed, 2 total
Tests:       2 passed, 2 total
Snapshots:   0 total
Time:        1.741 s
Ran all test suites.

さいごに

GASでテスト書きたいのでちょっと触ってみました!
次回はGAS+Jestでテスト書いた記事かければいいなーっと思っています💡

追記:書きましたー!!!
GASのテスト(Jest)を書く!!!

npxで電子名刺つくってみた!


先週、Nagoya.php#17でLTをしていた方がnpxを使った電子名刺で自己紹介をしていて、

めちゃくちゃカッコよくて真似して作ってみました!


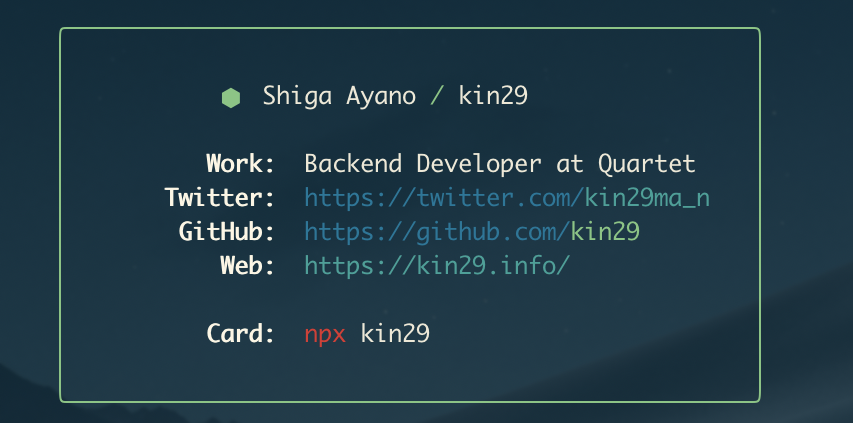
ターミナルで

$ npx kin29

を打つと以下スクショのように情報がでるようにしました!

追記(2022/09/10):使う機会がないので非公開&削除しました😅

business-card


仕組み

npx <user-name>を実行すると、

該当のnpmパッケージを落としてきて、package.jsonにある"main": "/bin/card.js"を実行する(テキストファイルをconsole.logする)とのこと。

package.json

{
...
  "main": "/bin/card.js",
  "bin": {
    "kin29": "./bin/card.js"
  },
...
  "scripts": {
    "prepublish": "npm run build",
    "build": "node build.js",
    "dev": "npm run build && node ./bin/card.js",
    "lint": "standard",
    "test": "echo \"Error: no test specified\" && exit 1"
  },
...

"scripts"にあるように、build.jsを自分用に修正をして、
npm run buildすると、出力ファイルである./bin/outputができます。
npm run dev で、 npx * のシュミレーションができます。

bin/card.js

#!/usr/bin/env node
// 👆 Used to tell Node.js that this is a CLI tool

'use strict'

const fs = require('fs')
const path = require('path')
const output = fs.readFileSync(path.join(__dirname, 'output'), 'utf8')
console.log(output)  // bin/output に出力テキストがある


そもそも、npxとは?

公式サイト:https://www.npmjs.com/package/npx

npm5.2.0以上が導入されていれば、npxコマンドも使えるそうです。

指定されたnpmパッケージがローカルに存在しない場合には、インストールをしてコマンド実行するものだそうです。

npmと違うのは、たとえローカルにインストールされていなくてインストールすることになっても、一時的にしかインストールせず実行後は削除されるらしいです。

ローカルを汚さずにすみますね😄


npmとnpxを比較してみた💡

● npm

:~/test-npm$ ls //まだローカルには何もない

:~/test-npm$ npm install eslint
...
+ eslint@6.3.0
added 119 packages from 75 contributors and audited 176 packages in 5.246s
found 0 vulnerabilities

:~/test-npm$ ls   //ローカルにインストールされた!
node_modules package-lock.json

:~/test-npm$ node_modules/.bin/eslint --version
v6.3.0

●npx

:~/test-npx$ ls

:~/test-npx$ npx eslint --version
npx: 119個のパッケージを4.678秒でインストールしました。
v6.3.0

:~/test-npx$ ls //ローカルにインストールされてないよ^^


npmに公開する

npxを使った電子名刺を公開するためには、npmで公開する必要があります。

やりかた

  1. https://www.npmjs.com/ にアカウントを登録する。
  2. $ npm adduser でログイン(1の登録情報を使う)する。
  3. GitHubリポジトリを作成し、masterにpushする。
  4. $ npm publish でnpmに公開をする。
    // タグをつけてpushする。
    $ git tag -a v1.0.0
    $ git push origin tags/v1.0.0
    
    // npmに公開する。
    $ npm publish ./
  5. npx <user-name> を試して、確認する。


さいごに

composerにもnpxみたいな機能ないんかな?って思って、

「composer npx」でググったら、https://github.com/composer/composer/issues/7272

↑でなんか、あるよー的な雰囲気なことを書いてると私の英訳力では感じたのですが、本当にできるのかよくわからんです 😅


参考:

[Qiita]npm 5.2.0の新機能!「npx」でローカルパッケージを手軽に実行しよう

[Qiita]npxでnodeモジュールを実行する

[Qiita]初めてのnpm パッケージ公開


claspでGAS(GoogleAppsScript)ファイルをGit管理する。

突然ですが、
私、ガチャガチャが好きなんです。
25才の今でも、ガンガンやっちゃってます。
最近の一押しはワニワニパニックとこれです。


はい、本題に入ります。

最近、社内ツールをGASで作ることが多かったり、
私自身slackのbotはGASで作ることが多いため、
Git管理をしたかったので方法を探しておりました。
そこで、この記事を参考にGit管理ができたので、書きます!
https://qiita.com/rf_p/items/7492375ddd684ba734f8

 
下記リポジトリはgasで作ったLINEbotです。
kin29/linebot_calendar
このソースも GAS + clasp + Gitをつかって管理しています。


使うもの

– GASファイル(プロジェクト)
– clasp
– Gitリポジトリ(GithubでもBitbucketでもなんでもok!)


claspとは?

Googleドライブ上にあるGoogleAppScriptなどのファイルを
コマンド操作でファイルの変更や保存などがブラウザでなく、
ローカル側で行うことができるものです。
GASって普通はGoogleドライブからブラウザ上でしかソースを書けないと思っていました。
claspを使うとエディターを使って、
コード整形とかも簡単にできるので超便利です。
参考:https://qiita.com/HeRo/items/4e65dcc82783b2766c03


0.claspコマンドの導入

npm i @google/clasp -g


1.clasp login

https://script.google.com/home/usersettings
にアクセスし、Google Apps Script APIをオンに。
これで該当アカウントのGASプロジェクトをclaspから操作が可能になります。
そして、ターミナルでclasp loginと打ちます。
すると、ブラウザが開いて許可しますかてきな質問が出てくるのでokすると成功したよメッセージがでてくればログイン完了です

$ clasp login
No credentials given, continuing with default...
🔑  Authorize clasp by visiting this url:
https://accounts.google.com/o/oauth2/v2/auth?access_type=XXXXXXXXXXXX...

Authorization successful.
Default credentials saved to: ~/.clasprc.json


2.既にあるGASファイルをローカルでpullする

$ mkdir [ファルダ名]  //このフォルダ以下をGit管理します。
$ cd [フォルダ名]
$ clasp clone [スクリプトID]
Cloned 2 files.
└─ コード.js
└─ appsscript.json

スクリプトIDは、 Git管理したいGASファイルを開いて、
ファイル>プロジェクトのプロパティ>情報の「スクリプト ID」に書いてます。

$ vi .clasp.json
{"scriptId":"[スクリプトID]"}

↑をしないと、複数GASプロジェクトが存在していると、
clasp pullした時にどのプロジェクトをpullしてくるかわからないので、
予期しないプロジェクトをpullしてきたりするのでした方がいいです!


3.Gitにファーストコミットする

リモートリポジトリは、GithubでもBitbucketでもなんでもokです。

$ git init
$ vi .gitignore //.clasp.jsonはGit管理外にする。
$ git status
$ git add -A
$ git commit -m 'first commit'
$ git remote add origin [リポジトリURL]
$ git push -u origin master


4-1.GoogleドライブよりGASファイルを更新後、ローカルにpullする

Googleドライブでコード変更した時は、ローカルにpullして同期します。

$ clasp pull

.clasp.jsonのスクリプトIDに基づくGASプロジェクトをpullしてきます。


4-2.ローカルよりGASファイルを更新後、ブラウザ側にpushする

ローカルでコード変更した時は、Googleドライブにpushして同期します。

$ clasp push

.clasp.jsonのスクリプトIDに基づくGASプロジェクトにpushします。


Gitで変更分をコミットする。

$ git add -A
$ git commit -m 'バグ修正'
$ git push origin [ブランチ名]

こんな感じです。
ちょっと面倒ですが、Git管理できるのは良きです。

htmlやjsのreset()は、ある意味リセットではない!

この前、酔って携帯を無くし、必死こいて探しましたが見つかりませんでした。
そしたらなんと、自宅の冷凍庫に冷凍保存してました。

どうも、こんなPONKOTSUです。(反省します)


今回は久しぶりにフロントエンドについてかきます。

htmlのinput[type=“reset”]は
初期値があれば、その初期値にリセットされる。

※jquery,jsのreset()も同様。

フォームなんかで、
選択済みのチェックボックスや入力済みの入力値を
\ 一括でリセットできるボタンがほしい /
って時があると思います。

そんなとき、こんなコード書くと思います。
(input[type=”reset”]というのがあるのをこの時知りました。)
htmlだったら…

  <input type="reset" value="リセットボタン">

jsだったら…

<button id="js_reset">jsのreset()</button>
<script>
 var js_rese_btn = document.getElementById('js_reset');

 js_rese_btn.addEventListener("click", function(){
   document.form.reset()
 }, false); 
</script>


これで、リセットはできるんです。
ただ、私の想定と違う時がありました。

それは、、、
リセット対象のformにvalueやselected,checkedなどの
初期値を設定している時です。
→値が「空」になるわけではなく、設定した初期値になる


デモはこちら。
https://jsfiddle.net/ocq0auwn/12/


ソースは感じ

<form action="#" name="form1">
  <!-- 「キン肉太郎」と入力して、リセットボタンを押すと、「山田孝之」になる。--> 名前:
  <input class="input_text_name" type="text" value="山田孝之" >
  飲んだお酒:
  <select class="select_sake">
    <option value="">選択してください</option>
    <option value="1">ビール</option>
    <option value="2">ハイボール</option>
    <option selected="selected" value="3">飫肥杉</option>
    <option value="4">もえしゃん</option>
    <option value="5">カプモーニ</option>
  </select>
  <input class="check_sake" checked="checked" type="checkbox" >お酒はほどほどにします。
  <input type="reset" value="htmlのリセット">

  <button class="jquery_reset">jQueryのreset()</button>
  <button id="js_reset">jsのreset()</button>
  <button class="jquery_reset_perfect">完全リセットしたい時に押すボタン(jQuery)</button>

jsはこんな感じ

/* JS */
var js_rese_btn = document.getElementById('js_reset');
js_rese_btn.addEventListener("click", function(){
  document.form1.reset()
}, false);

/* jQuery */
$('.jquery_reset').on('click', function(){
  $('form').get(0).reset();
  //document.form1.reset(); //jsだとこれ
}); 

//完全リセット
$('.jquery_reset_perfect').on('click', function(){
  $('.select_sake').find('option:selected').prop('selected', false);
  $('.input_text_name').val('');
  $('.check_sake').prop('checked', false);
});