こんにちは!
過去に簡単決済「stripe」を導入してみる。を紹介しました。
今更気づいたんですが、べつにLaravel使う必要なかったなって(笑)
ただ、使いたかったんだと思います!ww
そこで!
PHPのフレームワークを使わないパターンで
もっとシンプルに組み込みたいと思います。
完成は、こちらです。
[ kin29/stripe_practice_php ]
↑だと、.envの設定だけで
ビルドインサーバ立てたら、もうできちゃいます。
さあ、つくろう。
リファレンス
– stripe API
– Card Payments Quickstart
ほぼ、↑のクイックスタートをやってます。
環境
– Mac
– PHP7.2.7
準備
stripeアカウント発行、テスト環境申請(申請後すぐできました)
↑これだけ!
手順
1.プロジェクト(作業ディレクトリ)の作成
~$ mkdir stripe_practice_php/
2.stripe/stripe-phpの導入 ←composer経由
$ cd stripe_practice_php/
$ composer require stripe/stripe-php
You are running composer with xdebug enabled. This has a major impact on runtime performance. See https://getcomposer.org/xdebug
Using version ^6.20 for stripe/stripe-php
./composer.json has been created
Loading composer repositories with package information
Updating dependencies (including require-dev)
  - Installing stripe/stripe-php (v6.20.0)
    Downloading: 100%
Writing lock file
Generating autoload files

$ ls
composer.json composer.lock vendor
3.カード情報入力フォームをつくる。
$ cd stripe_practice_php/
$ vi index.php
...
<div class="content">
<div class="title">stripe DE おかいもの</div>
<div>¥100</div>
<form action="./payment.php" method="POST">
<script
src="https://checkout.stripe.com/checkout.js"
class="stripe-button"
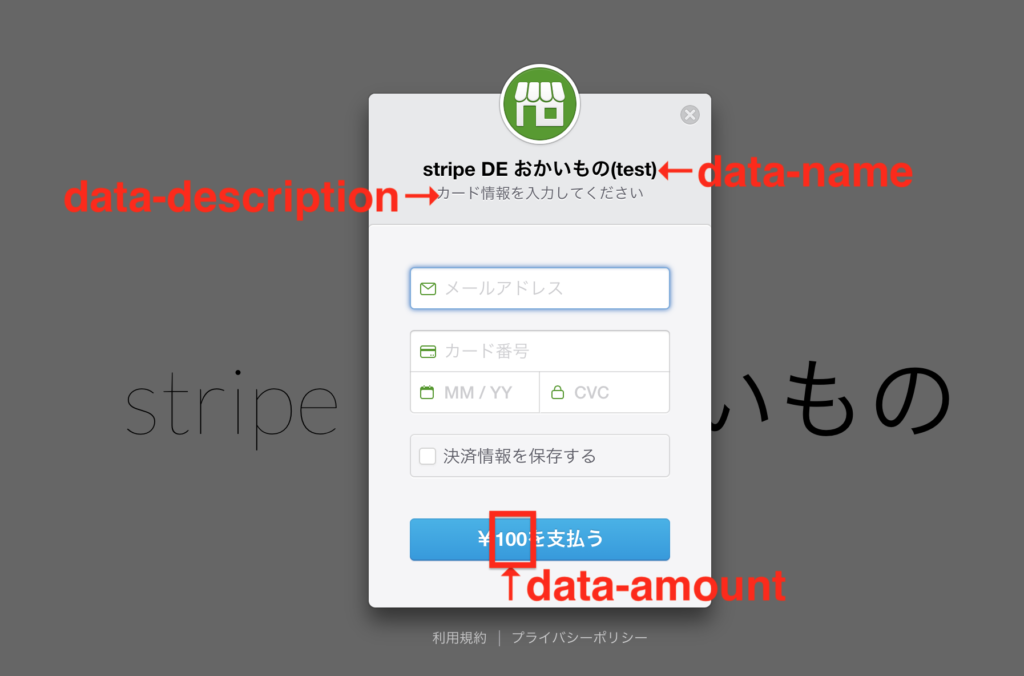
data-key="{pk_test_XXXXXXXXXXXXXXXXXXX}"
data-amount="{商品の値段}"
data-name="{カード入力モーダルのタイトル}"
data-description="{カード入力モーダルのタイトル下の説明文}"
data-image="https://stripe.com/img/documentation/checkout/marketplace.png"
data-locale="auto"
data-currency="jpy">
</script>
</form>
</div>
...
4.バックエンドをつくる。
$ cd stripe_practice_php/
$ vi payment.php
<?php
require __DIR__.'/vendor/autoload.php';

\Stripe\Stripe::setApiKey("{sk_test_XXXXXX}");

$token = $_POST['stripeToken']; //ここでAPIにリクエストしてる

$charge = \Stripe\Charge::create([
    'amount' => 100,
    'currency' => 'jpy',  //usd(ドル)→jpy(円)に変更しました。
    'description' => 'Example charge',
    'source' => $token,
]);

//thanks.phpにリダイレクトさせる。
header("Location: ./thanks.php");
5.サンクスページをつくる。
$ cd stripe_practice_php/
$ vi thanks.php
...

<div class="content">
   <div class="title">「stripe DE おかいもの」<br>ご利用TEGEありがとうございました。</div>
   <div>利用金額:¥100</div>
  </form>
</div>

...
6.完成! →実際に動かしてみる「http://localhost:8080/index.php」
$ cd stripe_practice_php/
$ php -S localhost:8080   //ビルドインサーバを立てる
※テスト用のカード番号の参考はこちら
https://stripe.com/docs/testing#cards
7.管理画面をみてみる。 →実際にみせちゃう
https://dashboard.stripe.com/test/dashboard
‘currency’ => jpy
に変更することにより、
円請求ができますが、管理画面ではドルに換算されていました。
まとめ
・簡単!早い!わかりやすい!
・ドキュメントは英語ですが、読みやすく充実してます。
・リンク型なので、面倒なトークン化(カード情報非保持)対応の必要なし!
・次は、PHP以外の言語でもしてみたいです!