GitHubのgit://形式のURLは暗号化されていないのでサポートされなくなったらしい。


何かの手違いでローカルPCでbrew servicesが使えなくなった。(それ以外のbrewコマンドは使える状態)

原因は、git clone https://... が失敗するためだったぽい。https://でなくgit@github.com: <user-name>/<repository>.gitをURLに指定するとできた🎉🙌

そもそもgit clone https://できないのがよくなさそう😅

error文にもある通りhttps://github.blog/2021-09-01-improving-git-protocol-security-github/をみると、git://は暗号化されていないのでサポートされなくなったらしい。

$ brew services --help
==> Tapping homebrew/services
Cloning into '/usr/local/Homebrew/Library/Taps/homebrew/homebrew-services'...
fatal: remote error:
The unauthenticated git protocol on port 9418 is no longer supported.
Please see https://github.blog/2021-09-01-improving-git-protocol-security-github/ for more information.
Error: Failure while executing; `git clone https://github.com/Homebrew/homebrew-services /usr/local/Homebrew/Library/Taps/homebrew/homebrew-services --origin=origin --template=` exited with 128.
Error: Failure while executing; `/usr/local/bin/brew tap homebrew/services` exited with 1.


# homebrew-services がない!!!
$ ll /usr/local/Homebrew/Library/Taps/homebrew
total 0
drwxr-xr-x 5 kin29 admin 160 4 29 17:25 .
drwxr-xr-x 5 kin29 admin 160 4 22 16:56 ..
drwxr-xr-x 17 kin29 admin 544 2 16 12:43 homebrew-cask
drwxr-xr-x 17 kin29 admin 544 2 16 12:43 homebrew-core


# git clone https://..だと失敗したので git@github.comを使うようにした。
$ git clone git@github.com:Homebrew/homebrew-services.git /usr/local/Homebrew/Library/Taps/homebrew/homebrew-services --origin=origin --template=
Cloning into '/usr/local/Homebrew/Library/Taps/homebrew/homebrew-services'...
remote: Enumerating objects: 1985, done.
remote: Counting objects: 100% (494/494), done.
remote: Compressing objects: 100% (162/162), done.
remote: Total 1985 (delta 338), reused 434 (delta 324), pack-reused 1491
Receiving objects: 100% (1985/1985), 545.80 KiB | 751.00 KiB/s, done.
Resolving deltas: 100% (893/893), done.
 

$ ll /usr/local/Homebrew/Library/Taps/homebrew
total 0
drwxr-xr-x 5 kin29 admin 160 4 29 17:25 .
drwxr-xr-x 5 kin29 admin 160 4 22 16:56 ..
drwxr-xr-x 17 kin29 admin 544 2 16 12:43 homebrew-cask
drwxr-xr-x 17 kin29 admin 544 2 16 12:43 homebrew-core
drwxr-xr-x 13 kin29 admin 416 4 29 17:25 homebrew-services //入った!

# 使えるようになったーーー!!!
$ brew services --help
Usage: brew services [subcommand]

Manage background services with macOS' launchctl(1) daemon manager.

If sudo is passed, operate on /Library/LaunchDaemons (started at boot).
Otherwise, operate on ~/Library/LaunchAgents (started at login).
claspでGAS(GoogleAppsScript)ファイルをGit管理する。

突然ですが、
私、ガチャガチャが好きなんです。
25才の今でも、ガンガンやっちゃってます。
最近の一押しはワニワニパニックとこれです。


はい、本題に入ります。

最近、社内ツールをGASで作ることが多かったり、
私自身slackのbotはGASで作ることが多いため、
Git管理をしたかったので方法を探しておりました。
そこで、この記事を参考にGit管理ができたので、書きます!
https://qiita.com/rf_p/items/7492375ddd684ba734f8

 
下記リポジトリはgasで作ったLINEbotです。
kin29/linebot_calendar
このソースも GAS + clasp + Gitをつかって管理しています。


使うもの

– GASファイル(プロジェクト)
– clasp
– Gitリポジトリ(GithubでもBitbucketでもなんでもok!)


claspとは?

Googleドライブ上にあるGoogleAppScriptなどのファイルを
コマンド操作でファイルの変更や保存などがブラウザでなく、
ローカル側で行うことができるものです。
GASって普通はGoogleドライブからブラウザ上でしかソースを書けないと思っていました。
claspを使うとエディターを使って、
コード整形とかも簡単にできるので超便利です。
参考:https://qiita.com/HeRo/items/4e65dcc82783b2766c03


0.claspコマンドの導入

npm i @google/clasp -g


1.clasp login

https://script.google.com/home/usersettings
にアクセスし、Google Apps Script APIをオンに。
これで該当アカウントのGASプロジェクトをclaspから操作が可能になります。
そして、ターミナルでclasp loginと打ちます。
すると、ブラウザが開いて許可しますかてきな質問が出てくるのでokすると成功したよメッセージがでてくればログイン完了です

$ clasp login
No credentials given, continuing with default...
🔑  Authorize clasp by visiting this url:
https://accounts.google.com/o/oauth2/v2/auth?access_type=XXXXXXXXXXXX...

Authorization successful.
Default credentials saved to: ~/.clasprc.json


2.既にあるGASファイルをローカルでpullする

$ mkdir [ファルダ名]  //このフォルダ以下をGit管理します。
$ cd [フォルダ名]
$ clasp clone [スクリプトID]
Cloned 2 files.
└─ コード.js
└─ appsscript.json

スクリプトIDは、 Git管理したいGASファイルを開いて、
ファイル>プロジェクトのプロパティ>情報の「スクリプト ID」に書いてます。

$ vi .clasp.json
{"scriptId":"[スクリプトID]"}

↑をしないと、複数GASプロジェクトが存在していると、
clasp pullした時にどのプロジェクトをpullしてくるかわからないので、
予期しないプロジェクトをpullしてきたりするのでした方がいいです!


3.Gitにファーストコミットする

リモートリポジトリは、GithubでもBitbucketでもなんでもokです。

$ git init
$ vi .gitignore //.clasp.jsonはGit管理外にする。
$ git status
$ git add -A
$ git commit -m 'first commit'
$ git remote add origin [リポジトリURL]
$ git push -u origin master


4-1.GoogleドライブよりGASファイルを更新後、ローカルにpullする

Googleドライブでコード変更した時は、ローカルにpullして同期します。

$ clasp pull

.clasp.jsonのスクリプトIDに基づくGASプロジェクトをpullしてきます。


4-2.ローカルよりGASファイルを更新後、ブラウザ側にpushする

ローカルでコード変更した時は、Googleドライブにpushして同期します。

$ clasp push

.clasp.jsonのスクリプトIDに基づくGASプロジェクトにpushします。


Gitで変更分をコミットする。

$ git add -A
$ git commit -m 'バグ修正'
$ git push origin [ブランチ名]

こんな感じです。
ちょっと面倒ですが、Git管理できるのは良きです。

stripe決済をフレームワーク使わずに組み込んでみる!(PHP)

こんにちは!
過去に簡単決済「stripe」を導入してみる。を紹介しました。
今更気づいたんですが、べつにLaravel使う必要なかったなって(笑)
ただ、使いたかったんだと思います!ww

そこで!
PHPのフレームワークを使わないパターンで
もっとシンプルに組み込みたいと思います。

完成は、こちらです。
[ kin29/stripe_practice_php ]
↑だと、.envの設定だけで
ビルドインサーバ立てたら、もうできちゃいます。


さあ、つくろう。

リファレンス

stripe API
Card Payments Quickstart
ほぼ、↑のクイックスタートをやってます。

環境

– Mac
– PHP7.2.7

準備

stripeアカウント発行、テスト環境申請(申請後すぐできました)
↑これだけ!

手順

1.プロジェクト(作業ディレクトリ)の作成

~$ mkdir stripe_practice_php/


2.stripe/stripe-phpの導入 ←composer経由

$ cd stripe_practice_php/
$ composer require stripe/stripe-php
You are running composer with xdebug enabled. This has a major impact on runtime performance. See https://getcomposer.org/xdebug
Using version ^6.20 for stripe/stripe-php
./composer.json has been created
Loading composer repositories with package information
Updating dependencies (including require-dev)
  - Installing stripe/stripe-php (v6.20.0)
    Downloading: 100%
Writing lock file
Generating autoload files

$ ls
composer.json composer.lock vendor


3.カード情報入力フォームをつくる。

$ cd stripe_practice_php/
$ vi index.php
...
<div class="content">  
  <div class="title">stripe DE おかいもの</div>
  <div>¥100</div>
    <form action="./payment.php" method="POST">
    <script
       src="https://checkout.stripe.com/checkout.js"
       class="stripe-button"
       data-key="{pk_test_XXXXXXXXXXXXXXXXXXX}"
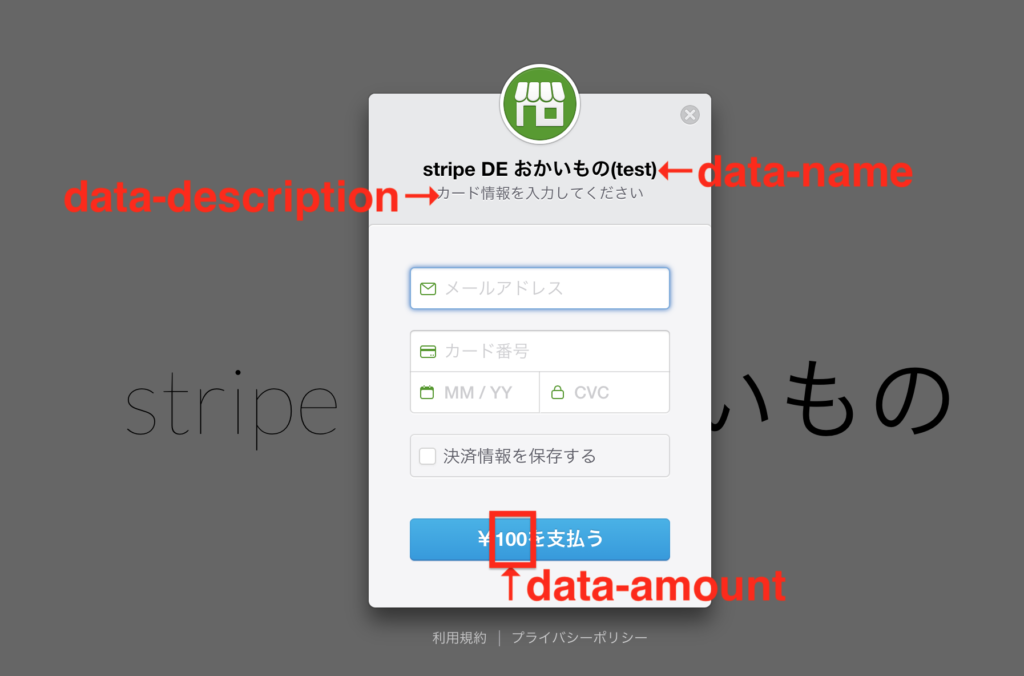
       data-amount="{商品の値段}"
       data-name="{カード入力モーダルのタイトル}"
       data-description="{カード入力モーダルのタイトル下の説明文}"
       data-image="https://stripe.com/img/documentation/checkout/marketplace.png"
       data-locale="auto"
       data-currency="jpy">
    </script>
  </form>
</div>
...


4.バックエンドをつくる。

$ cd stripe_practice_php/
$ vi payment.php
<?php
require __DIR__.'/vendor/autoload.php';

\Stripe\Stripe::setApiKey("{sk_test_XXXXXX}"); 

$token = $_POST['stripeToken']; //ここでAPIにリクエストしてる
   
$charge = \Stripe\Charge::create([
    'amount' => 100,
    'currency' => 'jpy',  //usd(ドル)→jpy(円)に変更しました。
    'description' => 'Example charge',
    'source' => $token,
]);
    
//thanks.phpにリダイレクトさせる。
header("Location: ./thanks.php");


5.サンクスページをつくる。

$ cd stripe_practice_php/
$ vi thanks.php
...

<div class="content">
   <div class="title">「stripe DE おかいもの」<br>ご利用TEGEありがとうございました。</div>
   <div>利用金額:¥100</div>
  </form>
</div>

...


6.完成! →実際に動かしてみる「http://localhost:8080/index.php

$ cd stripe_practice_php/
$ php -S localhost:8080   //ビルドインサーバを立てる

※テスト用のカード番号の参考はこちら
https://stripe.com/docs/testing#cards


7.管理画面をみてみる。 →実際にみせちゃう
https://dashboard.stripe.com/test/dashboard


‘currency’ => jpy

に変更することにより、
円請求ができますが、管理画面ではドルに換算されていました。


まとめ

・簡単!早い!わかりやすい!

・ドキュメントは英語ですが、読みやすく充実してます。

・リンク型なので、面倒なトークン化(カード情報非保持)対応の必要なし!

・次は、PHP以外の言語でもしてみたいです!